19 Mart 2008 Çarşamba

Schema Export with Ant

After some difficulties I have run schema export with ant. We use a separate propeties file with the same content as the jdbc.properties file that is used in connecting applications to the DB, in order to run the schema export task. Actually schemaexport also have "properties" attribute but it throws an exception like this.

[schemaexport] java.lang.UnsupportedOperationException: The user must supply a JDBC connection
[schemaexport] at org.hibernate.connection.UserSuppliedConnectionProvider.getConnection(UserSuppliedConnectionProvider.java:30)
[schemaexport] at org.hibernate.tool.hbm2ddl.ManagedProviderConnectionHelper.prepare(ManagedProviderConnectionHelper.java:28)

hibernate.cfg.xml


build.xml


You can download here working copy of our sample project.

13 Mart 2008 Perşembe

Adding Spring and Hibernate to Our Hello World JSF Application

In this section we will add Spring and Hibernate Capabilities to our sample web application So for this, we will have to add the spring and hibernate libraries and configuration files to the web application.
So, to integrate Hibernate and Spring frameworks with JSF framework we will have to make some changes and copy jar files related with the individual frameworks.

After downloading spring, hibernate and MySQL then installing MySQL we ready to start this section.

copy dom4j.jar from spring-framework-2.5.1\lib\dom4j directory into lib directory.
copy spring.jar from spring-framework-2.5.1\dist directory into lib directory.
copy jta.jar from spring-framework-2.5.1\lib\j2ee directory into lib directory.
copy servlet-api.jar from spring-framework-2.5.1\lib\j2ee directory into lib directory.
copy hibernate3.jar from hibernate-3.2 directory into lib directory of our application.

Finally here is the list of jar files in our application's lib directory:


In the figure below, you can see additional files and directory structure formed after adding spring and hibernate capabilities to our sample project.


Person.java


package pojo;
public class Person {
Integer id;
String name;
public Integer getId() {
return id;
}
public void setId(Integer id) {
this.id = id;
}
public String getName() {
return name;
}
public void setName(String name) {
this.name = name;
}
}


As you see our sample pojo has two attribute id and name. Our aim is to add this pojo to the database triggered by a button in the jsp page. Everything is simple now, we will add other required attributes later.

Person.hbm.xml


Create a hibernate mapping for any pojo that must be persisted. This is defined in another XML file (one per persistent object) which has an hbm.xml extension.

jdbc.properties

jdbc.driverClassName=com.mysql.jdbc.Driver
jdbc.url=jdbc:mysql://localhost:3306/sampleproject
jdbc.username=sampleproject
jdbc.password=sampleproject
hibernate.dialect=org.hibernate.dialect.MySQLDialect

We use this property file for connecting database.
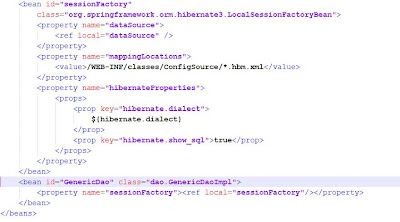
spring-context.xml


Welcome.java

faces-config.xml


add tags shown below to web.xml.

In this file;

  • The contextConfigLocation parameter defines the Spring configurations files to load, as shown in the servlet context below. If we wanted to load multiple Spring configuration files, we could use a comma as a delimiter in a tag.
  • ContextLoaderServlet will load the Spring configuration files when you start the Web application.

11 Mart 2008 Salı

Starting Web Application Development 2


I have recorded the development phase of “Hello World" JSF application but as you see it's not readable. You may reach the readable version of this video from my colleague Mehmet Gürsul's personal web site.


Now I’ll try to identify the steps of the “Hello World" JSF application.
Step 1 - Setting the workspaces JRE: We have to set the JRE of the workspace with the downloaded SDK 6’s JRE. Of the record, now SDK 6 is open source and you can attach the source files to view the code behind the class implementations. In the developing process I will be giving all the necessary source files of the related open source API’s.

Step 2 - Creating dynamic web project: By using project wizard we crate a new dynamic web project with using the JSF1.2 capabilities. In the wizard we have to modify some of the default values.

We have to increase Java Server Faces 1.1 to 1.2 and Dynamic Web Module 2.4 to 2.5 as the version 2.4 doesn't support Java Server Faces 1.2.

Step 3 - Configuring classpaths: After project is created we must add required jar files to project lib folder. Now required jars are only MyFaces implementation jars and their dependencies. You can find these jars MyFaces lib folder. To run our application we need one more jar that name is jstl.jar and standart.jar, you can find these jars tomcat\webapps\examples\WEB-INF\lib folder.

I'm sure you could easily add a server and create sample jsp to run our application. I want to talk about little what happened backround. Our faces-config.xml is empty yet. web.xml has two significant attributes, one of them is <servlet> and the other one is <servlet-mapping> .

<servlet>

<servlet-name>Faces Servlet</servlet-name>

<servlet-class>javax.faces.webapp.FacesServlet</servlet-class>

<load-on-startup>1&lt:/load-on-startup>

</servlet>


When an event occurs click a button for example, the event notification is sent via HTTP to the server. On the server is a special servlet called the FacesServlet. Each JSF application in the Web container has its own FacesServlet. For JSF requests to be processed, they must be directed to the FacesServlet.

<servlet-mapping>
<servlet-name>Faces Servlet</servlet-name>
<url-pattern>/faces/*</url-pattern>

</servlet-mapping>


This means that the URL of every request must contain the /faces/ pattern, as specified in the url-pattern element under the element.

We will add many capabilies in our sample project step by step. Every steps may come additional elements web.xml and faces-config.xml or new configuration files. I try to explain every element shortly.

Next step is connecting database and add simple domain object to database.

Starting Web Application Development 1

In this blog, i will try to explain my experiences about building web applications that includes many populer frameworks and tools. I'm planning to introduce building pure web application and then i will tell adding populer tools to this web application like JSF, Spring, Hibernate etc. Whenever i add a tool or framework, i will explain why we did this and benefits of this. Also i will write all exceptions caused by jar incompatibles.
First, we will build Hello World application with Eclipse IDE, JSF Apache MyFaces implementation and Apache Tomcat. Required downloads for starting listed as below:
  • Download Java EE + JDK then install default values.

  • Download Eclipse IDE then extract (Eclipse doesnt come with a setup. You can just extract and run Eclipse).

  • Download latest core - zip version Tomcat 6 then extract.

  • Download MyFaces zip version then extract.

We will come to other tools but for now these are enough.

Note: JAVA_HOME variable must be added to environment variables to start Tomcat.